 Ford Kuga Service ManualExterior Trim and Ornamentation
Exterior Trim (Component Location)
Exterior Trim (Component Location)
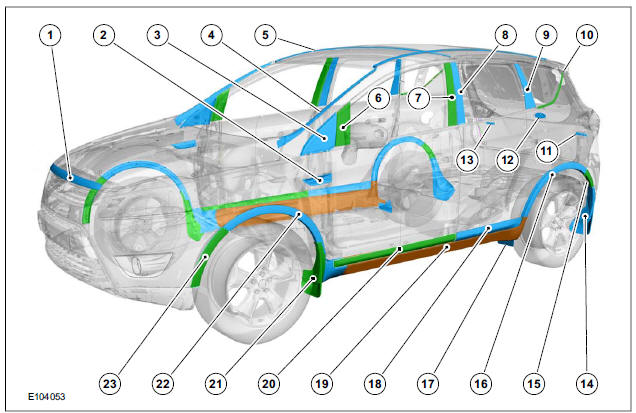
| Item | Description |
| 1 | Engine hood trim strip |
| 2 | Fender trim cover |
| 3 | Cover, front door window |
| 4 | Windshield strip |
| 5 | Roof strip |
| 6 | Front trim strip, front door window |
| 7 | Rear trim strip, front door window |
| 8 | Front trim strip, rear door window |
| 9 | Rear trim strip, rear door window |
| 10 | Trim strip, rear side window |
| 11 | Tailgate lettering |
| 12 | Tailgate emblem |
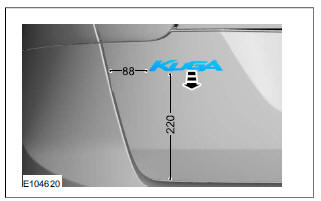
| 13 | Tailgate variant sign |
| 14 | Rear fender flap in rear wheel arch |
| 15 | Rear trim strip, rear wheel arch |
| 16 | Front trim strip, rear wheel arch |
| 17 | Front fender flap in rear wheel arch |
| 18 | Door trim strip, rear |
| 19 | Rocker panel moulding |
| 20 | Door trim strip, front |
| 21 | Front flap |
| 22 | Rear trim strip, front wheel arch |
| 23 | Front trim strip, front wheel arch |
Exterior Trim (System Operation and Component Description)
System Operation
Depending on the way in which they are attached, the components can either be reused or need to be replaced.
Components which are attached with adhesive take should be detached with a plastic wedge.
Component Description
Engine hood trim strip
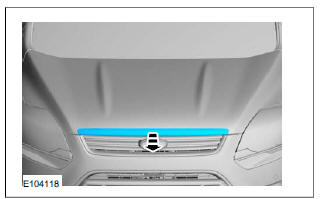
The trim strip is glued.
A new one will need to be fitted after the old one has been removed.
Windshield strip
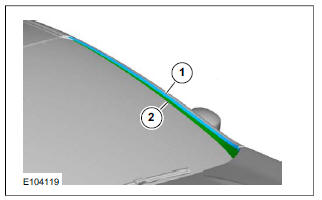
The trim strip comes in two parts. Part 1 is inserted in part 2 and can be pulled out to the top.
Part 2 is glued and only becomes accessible once the windshield has been removed.
Both parts will need to be replaced with new ones after the old ones have been removed.
Roof strip
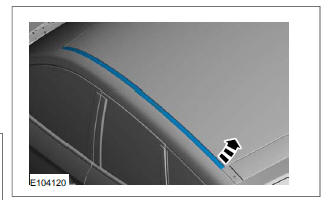
The fender flap is attached with clips and one screw.
It can be reused after it has been removed
Front trim strip, front wheel arch
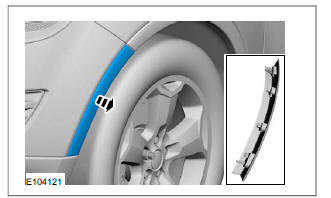
The trim strip is a push-fit.
The trim strip can be reused after it has been removed.
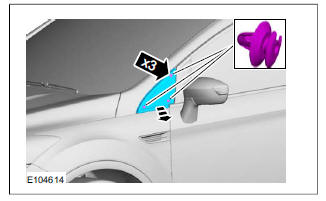
Front flap
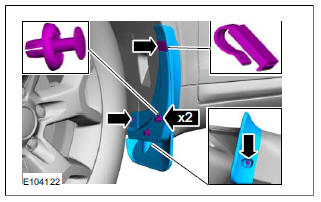
The front fender flap is attached with clips and screws.
It can be reused after it has been removed.
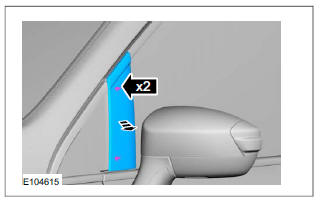
Rear trim strip, front wheel arch
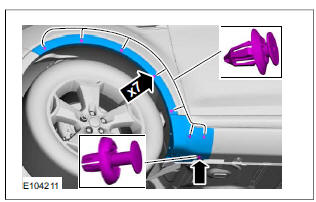
First detach the front fender flap.
The strip is secured with clips.
The trim strip can be reused after it has been removed.
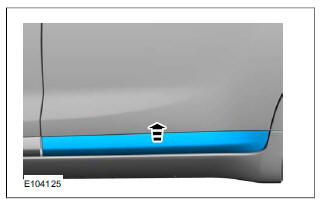
Door trim strip, front
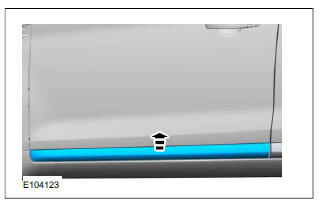
The strip is secured with adhesive tape.
A new trim strip will need to be fitted after the old one has been removed.
Front fender flap in rear wheel arch
The fender flap is attached with clips and one screw.
It can be reused after it has been removed.
Rocker panel moulding
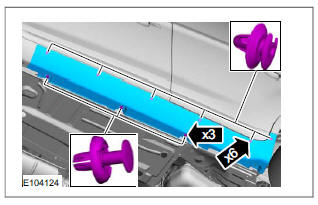
First detach the front fender flap in the rear wheelhouse.
The strip is secured with clips.
The trim strip can be reused after it has been removed.
Door trim strip, rear
The strip is secured with adhesive tape.
A new trim strip will need to be fitted after the old one has been removed.
Front trim strip, rear wheel arch
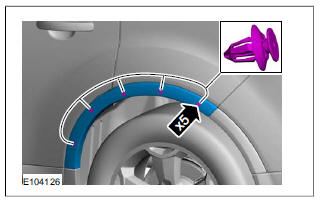
The strip is secured with clips.
The trim strip can be reused after it has been removed.
Rear fender flap in rear wheel arch

The fender flap is attached with clips and screws. It can be reused after it has been removed
Rear trim strip, rear wheel arch
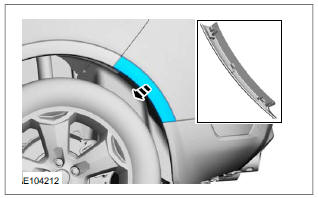
First detach the rear fender flap in the rear wheelhouse.
The trim strip is a push-fit.
The trim strip can be reused after it has been removed.
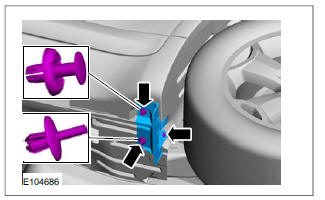
Fender trim cover
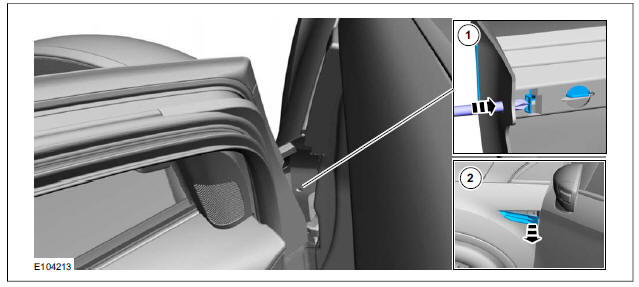
1. With the front door open, guide a screwdriver through the indicated opening and lightly press the tab forwards to unhook the insert.
2. Take out the cover from the outside.
The cover can be reused after it has been removed.
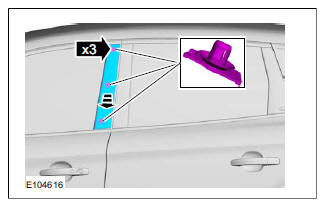
Cover, front door window
The cover is secured with clips.
CAUTION: Take extra care not to damage the clips.
The cover can be reused after it has been removed.
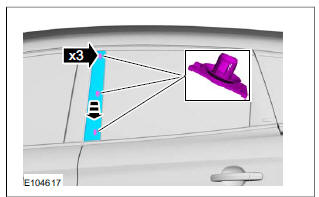
Front trim strip, front door window
First remove the inner trim of the side window in order to gain access to the fastening screws of the trim strip.
Refer to: Front Door Window Glass (501-11 Glass, Frames and Mechanisms, Removal and Installation).
The trim strip is secured with screws.
The trim strip can be reused after it has been removed.
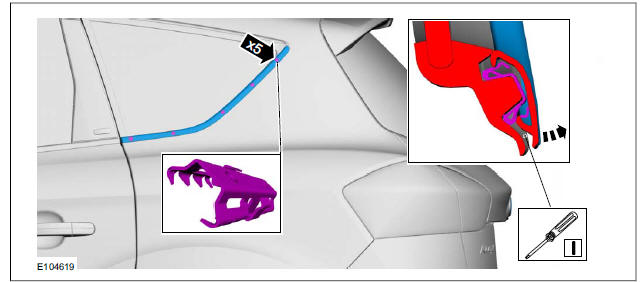
Rear trim strip, front door window
The trim strip is secured with clips and glued as well.
A new trim strip will need to be fitted after the old one has been removed.
Front trim strip, rear door window
The trim strip is secured with clips and glued as well.
Remove the window seal prior to removal.
Refer to: Rear Door Window Glass (501-11 Glass, Frames and Mechanisms, Removal and Installation).
The window seal cannot be refitted until the trim strip has been installed.
A new trim strip will need to be fitted after the old one has been removed.
Rear trim strip, rear door window
The trim strip is secured with clips and glued as well.
A new trim strip will need to be fitted after the old one has been removed.
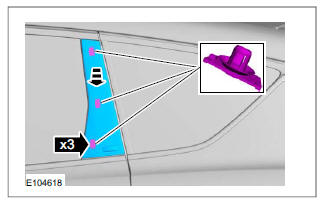
Trim strip, rear side window
The strip is secured with clips
CAUTION: Take extra care when handling the component
To remove the strip: 1. Using a screwdriver, press against the lower hook at the rear clip and unhook the strip from the lower edge.
2. Unhook the upper edge of the strip at the rear clip.
3. Repeat these steps on the remaining clips (working from the rear to the front).
The trim strip can be reused after it has been removed.
For installation: 1. Hook in the strip at the upper hook on the front clip and then allow it to clip into the lower hook.
2. Repeat this step on the remaining clips (working from the front to the rear).
Tailgate lettering
A new replacement will needed after the old one has been removed.
Tailgate emblem
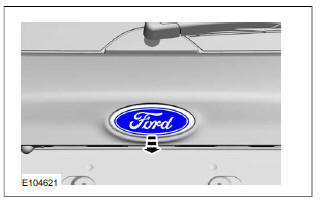
The emblem is secured with adhesive tape.
A new one will need to be fitted after the old one has been removed.
Tailgate variant sign

he sign is secured with adhesive tape.
A new one will need to be fitted after the old one has been removed.
Exterior Trim (Component Location)
Rear Spoiler
Roof Rail
Front Fender Moulding
Ford Kuga Service Manual
- General Information
- Jacking and Lifting
- Noise, Vibration and Harshness
- Suspension System - General Information
- Climate Control
- Auxiliary Climate Control
- Instrument Cluster and Panel Illumination
- Instrument Cluster
- Horn
- Warning Devices
- Parking Aid
- Charging System - General Information
- Battery, Mounting and Cables
- Generator and Regulator
- Voltage Converter/Inverter
- Information and Entertainment System - General Information
- Information and Entertainment System
- Exterior Lighting
- Interior Lighting
- Daytime Running Lamps (DRL)
- Module Communications Network
- Module Configuration
- Wiring Harnesses
- Anti-Theft - Active
- Anti-Theft - Passive
- Multifunction Electronic Modules
- Front End Body Panels
- Body Closures
- Interior Trim and Ornamentation
- Exterior Trim and Ornamentation
- Rear View Mirrors
- Seating
- Glass, Frames and Mechanisms
- Instrument Panel and Console
- Handles, Locks, Latches and Entry Systems
- Wipers and Washers
- Bumpers
- Safety Belt System
- Supplemental Restraint System
- Body Repairs - General Information
- Body Repairs - Vehicle Specific Information and Tolerance Checks
- Front End Sheet Metal Repairs
- Roof Sheet Metal Repairs
- Side Panel Sheet Metal Repairs
- Rear End Sheet Metal Repairs
- Paint - General Information
- Uni-Body, Subframe and Mounting System
- Suspension System - General Information
- Front Suspension
- Rear Suspension
- Wheels and Tires
- Driveshaft
- Rear Drive Axle/Differential
- Front Drive Halfshafts
- Rear Drive Halfshafts
- Brake System - General Information
- Front Disc Brake
- Rear Disc Brake
- Parking Brake and Actuation
- Hydraulic Brake Actuation
- Power Brake Actuation
- Anti-Lock Control
- Anti-Lock Control - Stability Assist
- Steering System - General Information
- Power Steering
- Steering Linkage
- Steering Column
- Steering Column Switches
- Engine System - General Information
- Engine- 2.5L Duratec (147kW/200PS) - VI5
- Engine Cooling
- Fuel Charging and Controls-2.5L Duratec (147kW/200PS) - VI5
- Fuel Charging and Controls - Turbocharger- 2.5L Duratec (147kW/200PS) - VI5
- Accessory Drive - 2.5L Duratec (147kW/200PS) - VI5
- Starting System- 2.5L Duratec (147kW/200PS) - VI5
- Engine Ignition - 2.5L Duratec (147kW/200PS) - VI5
- Engine Emission Control - 2.5L Duratec (147kW/200PS) - VI5
- Intake Air Distribution and Filtering - 2.5L Duratec (147kW/200PS) - VI5
- Evaporative Emissions
- Electronic Engine Controls
- Automatic Transmission/Transaxle
- Transmission/Transaxle Cooling
- Automatic Transmission/Transaxle External Controls
- Transfer Case
- Exhaust System-
- Fuel System
- Fuel Tank and Lines
- Acceleration Control
- Speed Control
- Climate Control System
- Climate Control
Main Categories

0.007