 Ford Kuga Service ManualPaint - General Information » Paint Repairs
Pre-treatment of the surface
Pre-treatment of the surface
Perfect preparation of the subsurface is the precondition for a brilliant paintwork result. Faults in the preliminary stages delay completion and cause unnecessary extra work. The working steps described here demonstrate how important it is to follow these instructions step by step.
NOTE: Thorough cleaning of the vehicle and especially of the area being repaired is particularly important because of the danger of contamination of the paint.
Clean the area of the damage
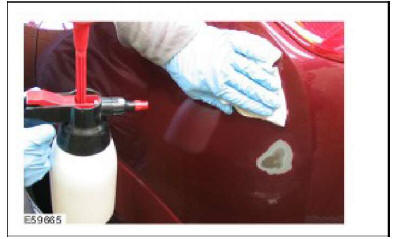
Clean the damaged surface thoroughly, to allow the extent of the damage to be seen. Use silicone remover to produce a grease-free surface.
NOTE: The treated surface must be rubbed with a clean dry cloth before the solvent evaporates, otherwise there will be no cleaning effect.
Effective de-greasing is important not only before the application of paint, but also before all sanding stages, for two reasons:
- During sanding of grease contaminated surfaces, globules may form with the sanding dust. Sanding marks will occur and the sanding medium quickly becomes unuseable.
- Oil and grease are embedded by the action of the abrasive particles, and are then very difficult to remove.
Establish the area of damage and the repair stages. In doing so, establish how much disassembly work must be undertaken. Perform a color test at this stage.
Mask off the area of the repair ready for preparatory work.
Sand out the damage location
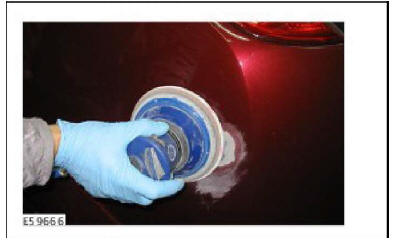
When sanding, produce smooth transitions from the painted area to the bare metal.
Use an eccentric sander and P80 or P120 abrasive sheets. Finish off sanding with P150 or P180. The remaining adhering sanding dust must be completely removed.
Cleaning, de-greasing
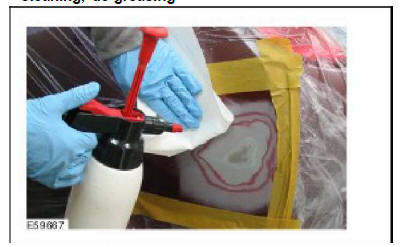
Use silicone remover to thoroughly clean the surface in order to remove grease residues, sweat from the hands and other contamination.
NOTE: Use a solvent test to establish whether the old paint can be etched. Apply 2-component thinners to the damaged area using a clean cloth and rub lightly for about 1 minute. If the subsurfaces can be etched away, special pre-treatment is necessary. See "Tips and Tricks"
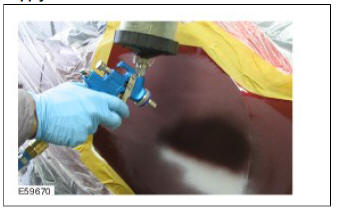
Apply primer filler
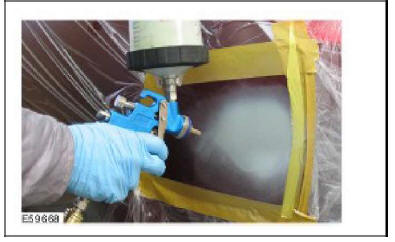
Before applying stopper, apply primer to the sanded and bare surface.
Allow the primer to dry and then lightly sand by hand using P220 - P400 dry.
NOTE: Most stopper can be applied directly to bare metal. But application of a primer filler provides better corrosion protection.
NOTE: Avoid sanding through to the bare metal.
Points which are sanded through must be retreated with primer filler.
Stopper application
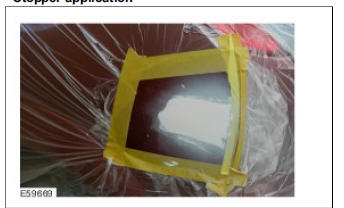
Pre-sand the hardened stopper using an eccentric sander and P80 dry, then final-sand using P120 - P140 dry. Clean the sanded surface using silicone remover.
Apply 2-component stopper to the filled surface.
The stopper compound must only be applied thinly.
NOTE: Use of a testing powder is recommended so that the sanding process can be more easily checked.
Apply filler
Filler can now be applied to the dried repair area.
Choose the correctly toned filler according to the manufacturer's instructions.
NOTE: Alternatively, filler with the correct tone can be mixed with the aid of colour matching cards.
Sand the filler.
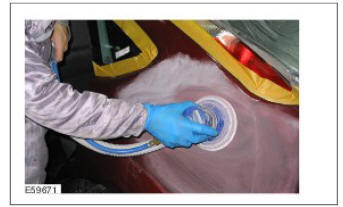
The working area is expanded by applying new masking. This makes it possible to even out the transition from the damage area to the vehicle paintwork.
NOTE: The primer filler must be carefully sanded.
Faults in the primer filler layer will be visible in the top coat.
The sanding process consists of two stages.
Coarse sanding levels out the surface of the filler primer. Fine sanding ensures the necessary surface structure which allows the top coat to adhere well and cover sanding marks.
Sand the filler using the eccentric sander and P400 - P500 used dry. Clean the sanded filler finished surface using silicone remover.
The painted area is matted using a fine matting sponge, and then thoroughly cleaned.
Surface ready for paint

The surface which has been repaired and then prepared according to the manufacturer's instructions is now ready for basic paint application.
General information
Pre-treatment of the surface
Top coat application
Repair stages for repair painting
Polish
Aids
Ford Kuga Service Manual
- General Information
- Jacking and Lifting
- Noise, Vibration and Harshness
- Suspension System - General Information
- Climate Control
- Auxiliary Climate Control
- Instrument Cluster and Panel Illumination
- Instrument Cluster
- Horn
- Warning Devices
- Parking Aid
- Charging System - General Information
- Battery, Mounting and Cables
- Generator and Regulator
- Voltage Converter/Inverter
- Information and Entertainment System - General Information
- Information and Entertainment System
- Exterior Lighting
- Interior Lighting
- Daytime Running Lamps (DRL)
- Module Communications Network
- Module Configuration
- Wiring Harnesses
- Anti-Theft - Active
- Anti-Theft - Passive
- Multifunction Electronic Modules
- Front End Body Panels
- Body Closures
- Interior Trim and Ornamentation
- Exterior Trim and Ornamentation
- Rear View Mirrors
- Seating
- Glass, Frames and Mechanisms
- Instrument Panel and Console
- Handles, Locks, Latches and Entry Systems
- Wipers and Washers
- Bumpers
- Safety Belt System
- Supplemental Restraint System
- Body Repairs - General Information
- Body Repairs - Vehicle Specific Information and Tolerance Checks
- Front End Sheet Metal Repairs
- Roof Sheet Metal Repairs
- Side Panel Sheet Metal Repairs
- Rear End Sheet Metal Repairs
- Paint - General Information
- Uni-Body, Subframe and Mounting System
- Suspension System - General Information
- Front Suspension
- Rear Suspension
- Wheels and Tires
- Driveshaft
- Rear Drive Axle/Differential
- Front Drive Halfshafts
- Rear Drive Halfshafts
- Brake System - General Information
- Front Disc Brake
- Rear Disc Brake
- Parking Brake and Actuation
- Hydraulic Brake Actuation
- Power Brake Actuation
- Anti-Lock Control
- Anti-Lock Control - Stability Assist
- Steering System - General Information
- Power Steering
- Steering Linkage
- Steering Column
- Steering Column Switches
- Engine System - General Information
- Engine- 2.5L Duratec (147kW/200PS) - VI5
- Engine Cooling
- Fuel Charging and Controls-2.5L Duratec (147kW/200PS) - VI5
- Fuel Charging and Controls - Turbocharger- 2.5L Duratec (147kW/200PS) - VI5
- Accessory Drive - 2.5L Duratec (147kW/200PS) - VI5
- Starting System- 2.5L Duratec (147kW/200PS) - VI5
- Engine Ignition - 2.5L Duratec (147kW/200PS) - VI5
- Engine Emission Control - 2.5L Duratec (147kW/200PS) - VI5
- Intake Air Distribution and Filtering - 2.5L Duratec (147kW/200PS) - VI5
- Evaporative Emissions
- Electronic Engine Controls
- Automatic Transmission/Transaxle
- Transmission/Transaxle Cooling
- Automatic Transmission/Transaxle External Controls
- Transfer Case
- Exhaust System-
- Fuel System
- Fuel Tank and Lines
- Acceleration Control
- Speed Control
- Climate Control System
- Climate Control
Main Categories

0.0083