 Ford Kuga Service ManualBody Repairs - General Information » Corrosion Prevention
Corrosion protection measures during repair work
Corrosion protection measures during repair work
CAUTION: Always be extremely careful when handling solvents, sealants and adhesives. Some products contain substances harmful to health or give off harmful or poisonous vapors. Always follow the manufacturer's instructions. If there is any doubt as to whether a particular solvent is suitable, it must NOT be used.
All Ford bodywork components have a cathodic primer. Moreover, most parts are zinc-plated on one or both sides. If possible, these protective layers must not be damaged.
Before welding
Interior surfaces of new bodywork components which will no longer be accessible after installation must be painted beforehand. The welding flanges are treated with a special welding primer. The joint areas are not always accessible from inside later.
Therefore, prepare these areas so that no soot is produced by burning paint during welding.
NOTE: In order to ensure that the corrosion protection produced in production is not destroyed, the working area must be kept as small as possible.
NOTE: Do not touch cleaned bare metal any more with the bare hands. The dampness of your hands will corrode the metal.
Procedure:
- Remove the primer or paint/zinc layer in the welding area using a tress wire brush to prevent the formation of soot from the paint.
- Thoroughly clean the welding area with a metal cleaning agent and rub dry.
- Coat the welding flange with welding primer on all sides and allow to dry.
NOTE: The welding primer must only be applied thinly to the spot welding area, to minimize spattering when welding
After welding
During repair work, body panels are often heated at very high temperatures, which results in the destruction of the corrosion protection.
Reworking of the affected areas is therefore vital:
- Grind the welded seams flat and clean thoroughly with silicone remover. Dry with a lint-free cloth.
- If the join area is accessible from the inside, the transition area to the paint must be abraded for all types of join so that good adhesion of the primer is achieved later.
- If the join area is not accessible from the inside, the cleaning and sanding work is not done. For this reason, ensure that there is as little contamination as possible in the area of the repair. This allows the cavity wax applied later to penetrate the join area without hindrance.
NOTE: Only apply a small amount of panel cleaner to the cleaning cloth when cleaning the repair area.
Make sure that no cleaner reaches the connecting flange, so that the welding primer is not washed away again.
Priming after welding
Primer is applied to the welded flanges after cleaning. A check must also be made that the production corrosion protection is present in the area of the flanges. Any damage must also be re-primed.
Sealing work
- If MIG welding is carried out during a sectional repair on a connecting flange with sealant or adhesive material, the material must be applied at a distance of approx. 10 mm from the weld spot.
- These areas must be sealed very carefully after the work has been completed
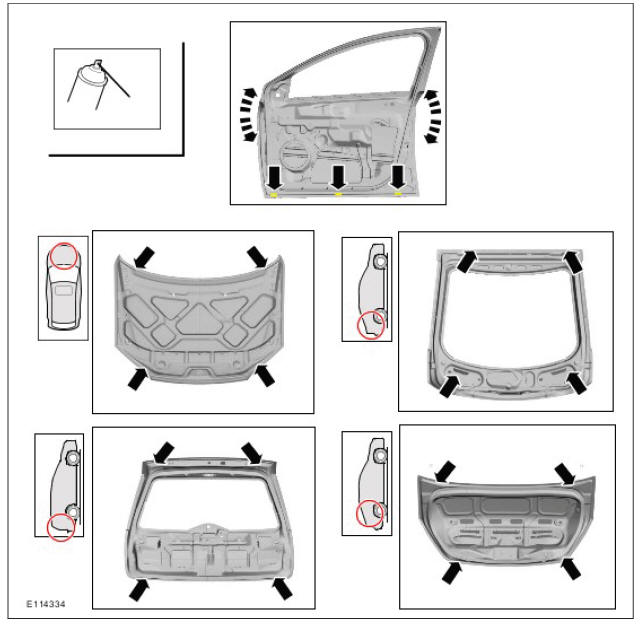
Depending on the type of repair, the clinched flanges on the hood, doors, tailgate and trunk lid must be sealed with clinched flange sealer.
Clinched flange protection with flat nozzle
Clean the clinched flange area of the new component with silicone remover and dry with a lint-free cloth.
The sealant must be applied to the dry primed surface (i.e. dip priming as for delivery).
Apply clinched flange protection to the clinched flange using one of the flat nozzles supplied. The nozzle must be cut to the necessary width beforehand and the guide stop cut as required.
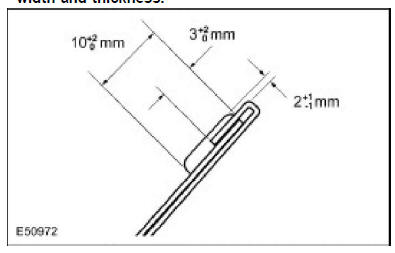
During application the clinched edge must be covered with an overlap of at least 3 mm. The beginnings, ends and edges or interruptions in the sealer bead need to be reworked by forming with a brush or a spatula, to ensure a 100% tight sealing of the flange.
The speed and angle of application are decisive for a good appearance and a bubble-free bead.
Always apply the sealer with as few as possible interruptions to avoid sealer rework. Never use solvents or thinners as this will considerably slow down the hardening process of the sealer.
For an application thickness of 3 mm of the clinched flange sealer it is recommended to allow to dry over night at room temperature. A minimum hardening time of 5 hours is required anyhow before a 2-component primer can be applied.
Clinched flange protection applied to the correct width and thickness
Underbody protection/stone chip protection
The underbody protection is used as corrosion protection and must also be applied such that it matches the original condition, from a visual perspective.
Two main application methods are used in production:
- The underbody protection is applied as a sprayable sealing compound.
- In the area around the structural members, the underbody protection is sprayed on and spread across a wide area.
Because of the coarse surface structure of the stone chip protection material, it is recommended to only perform a repair over the whole surface, if there is damage over visible areas. Otherwise there is the danger of serious irregularities on the surface.
The thickness and appearance of the underbody protection and stone chip protection must be matched to the original. Special spray guns are used to work the materials for this reason. A test spray must always be performed beforehand however, to determine the correct appearance and layer thickness.
Cavity protection
After painting work has been completed, a general check is made of the work that has been done.
Before final reassembly of the vehicle, the cavity wax protection in the area of the repair must be renewed. Cavity wax protection must be performed carefully so that the quality of the repair conforms with Ford standards:
- Guide the cavity wax probe carefully in the area of the repair so that targeted corrosion protection is achieved.
- Pay special attention to edges and swage line on stepped joints, the wax must cover the inner edge areas.
- The cavity wax must flow along the stepped sheets so that the wax is drawn between them by capillary action.
A hole may be drilled in a suitable place for areas which are not accessible for the application of cavity wax. The diameter depends on the size of plugs available. When this is done it is vital to make sure that no drilling swarf remains in the cavity (rust will form if any remains). The edge of the hole must be treated with cavity wax. Finally close with a plug and seal with underseal.
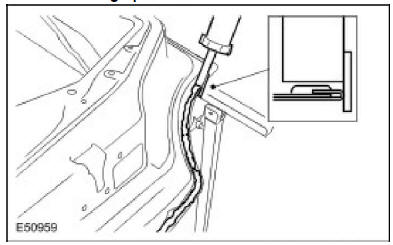
Only on components with clinched flange edges: After painting, the inner clinched flange edge must be sealed as far as is possible with cavity wax. For this, the repaired component should be positioned upright and corrosion protection wax sprayed into the water drainage holes and/or the thread holes for the hinges in both directions (50 ml corresponds to about 20 seconds spraying time).
For doors, tilt and turn the component to spread the corrosion protection wax over the whole edge of the flange.
Wax application
Panel coatings and corrosion protection
Corrosion protection measures during repair work
Corrosion protection for the floor pan (example)
Ford Kuga Service Manual
- General Information
- Jacking and Lifting
- Noise, Vibration and Harshness
- Suspension System - General Information
- Climate Control
- Auxiliary Climate Control
- Instrument Cluster and Panel Illumination
- Instrument Cluster
- Horn
- Warning Devices
- Parking Aid
- Charging System - General Information
- Battery, Mounting and Cables
- Generator and Regulator
- Voltage Converter/Inverter
- Information and Entertainment System - General Information
- Information and Entertainment System
- Exterior Lighting
- Interior Lighting
- Daytime Running Lamps (DRL)
- Module Communications Network
- Module Configuration
- Wiring Harnesses
- Anti-Theft - Active
- Anti-Theft - Passive
- Multifunction Electronic Modules
- Front End Body Panels
- Body Closures
- Interior Trim and Ornamentation
- Exterior Trim and Ornamentation
- Rear View Mirrors
- Seating
- Glass, Frames and Mechanisms
- Instrument Panel and Console
- Handles, Locks, Latches and Entry Systems
- Wipers and Washers
- Bumpers
- Safety Belt System
- Supplemental Restraint System
- Body Repairs - General Information
- Body Repairs - Vehicle Specific Information and Tolerance Checks
- Front End Sheet Metal Repairs
- Roof Sheet Metal Repairs
- Side Panel Sheet Metal Repairs
- Rear End Sheet Metal Repairs
- Paint - General Information
- Uni-Body, Subframe and Mounting System
- Suspension System - General Information
- Front Suspension
- Rear Suspension
- Wheels and Tires
- Driveshaft
- Rear Drive Axle/Differential
- Front Drive Halfshafts
- Rear Drive Halfshafts
- Brake System - General Information
- Front Disc Brake
- Rear Disc Brake
- Parking Brake and Actuation
- Hydraulic Brake Actuation
- Power Brake Actuation
- Anti-Lock Control
- Anti-Lock Control - Stability Assist
- Steering System - General Information
- Power Steering
- Steering Linkage
- Steering Column
- Steering Column Switches
- Engine System - General Information
- Engine- 2.5L Duratec (147kW/200PS) - VI5
- Engine Cooling
- Fuel Charging and Controls-2.5L Duratec (147kW/200PS) - VI5
- Fuel Charging and Controls - Turbocharger- 2.5L Duratec (147kW/200PS) - VI5
- Accessory Drive - 2.5L Duratec (147kW/200PS) - VI5
- Starting System- 2.5L Duratec (147kW/200PS) - VI5
- Engine Ignition - 2.5L Duratec (147kW/200PS) - VI5
- Engine Emission Control - 2.5L Duratec (147kW/200PS) - VI5
- Intake Air Distribution and Filtering - 2.5L Duratec (147kW/200PS) - VI5
- Evaporative Emissions
- Electronic Engine Controls
- Automatic Transmission/Transaxle
- Transmission/Transaxle Cooling
- Automatic Transmission/Transaxle External Controls
- Transfer Case
- Exhaust System-
- Fuel System
- Fuel Tank and Lines
- Acceleration Control
- Speed Control
- Climate Control System
- Climate Control
Main Categories

0.0143